Before you can sew anything with your sewing machine, you need to know how to thread your sewing machine!
Threading the machine may seem very confusing, especially since different makes of sewing machines have different methods for threading. But it’s actually easy –honest! if you keep one thing in mind:
All the steps of threading a sewing machine are done to make sure that the right length of thread for the chosen stitch length is delivered from the spool to the needle, and from the bobbin to the stitch, at the correct tension, and without twisting or pulling.
Note: I’m using photos from two machines in this post to show some of the differences and similarities between machines. The white machine is a Janome 2030QDC, the beige machine is a Bernina 330.
How a stitch is made
Each machine stitch has two threads, one from the spool and one from the bobbin. The spool thread is pushed into the fabric by the needle, catches thread from the bobbin and pulls it up part the way through the fabric.
Machine stitching looks like this, with the top thread from the spool looping around the bottom thread from the bobbin at regular intervals, evenly between both pieces of fabric. The space between the layers of fabric has been exaggerated in these illustrations to show the stitches more clearly, in real life, they’d be touching. This is a strong seam with the thread securely “buried” between both layers of fabric.

If the top tension is too high, the stitches will look like this. The high tension of the top thread has pulled the bottom (bobbin) thread up to and nearly through the top layer of fabric. This is a very weak seam; the top thread can be pulled out easily.

And if the bottom tension is too high (or the top tension too low in relation), the stitches will look like this. The high tension of the bottom thread has pulled the top thread down to and nearly through the bottom layer of fabric. This is a very weak seam; the bottom (bobbin) thread can be pulled out easily.

Fill the Bobbin
The first thing to do is wind thread onto a bobbin. This is called “filling the bobbin.” It’s best to do this first because threading the bobbin uses some of the same guides as threading and if your machine is threaded, it’ll just get in the way.
There are often diagrams on the machine indicating how to fill the bobbin or thread the machine. I hope my instructions help them make more sense.
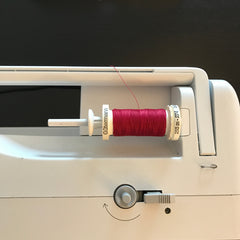
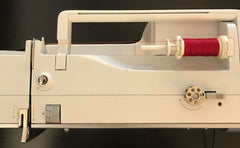
Put a spool of thread on the spool pin and cap it with the spool holder, if needed. The thread should wind off the spool towards the back of the machine.

Draw the thread through the back thread guide (if there is one) and then around the round bobbin thread guide on the top of the machine.


Wind the thread around the bobbin thread guide. If you look closely, you’ll see that the bobbin thread guide has a spring between its two plates. This is the first step to making sure that makes sure that the bobbin thread is wound on the bobbin with the correct tension.
Some manufacturers recommend that the thread be wrapped counter-clockwise around the bobbin thread guide, as shown in this diagram.

But since the spring in the bobbin thread guide are what make sure the bobbin is wound with the correct tension, I don’t think there’s enough contact between the bobbin thread guide’s plates to put the correct tension on the thread. I recommend (as does my Bernina machine) that for all machines, the thread be wound clockwise, as shown in this diagram.

Then feed the thread through a hole on the bobbin and hold it in place, like so.

Place the bobbin on the bobbin winder. If your machine has an oval cog next the bobbin winder, push the bobbin winder to the right against the stopper. Hold the thread loosely, then depress the foot pedal or press the start/stop button to begin winding the bobbin.

If your machine has a lever/switch kind of thing beside the bobbin winder, hold the thread loosely and push the switch towards the bobbin. The bobbin will begin to wind automatically.

Once the bobbin is full, the machine should stop. Trim the thread from the top of the bobbin, clip the thread from the spool, remove the bobbin and set it aside.
Insert the Bobbin
Okay, you’ve got the bobbin filled, so now it’s time to insert the bobbin in the machine so it's ready for the spool thread.
When it comes to bobbins, there are two main types of sewing machine: top-loading and front-loading.
In my experience top-loading machines are easier to load, easier to keep track of the thread level in the bobbin, and a lot fussier to maintain the bottom tension.
On the other hand, front-loading machines are a bit harder to load, impossible to keep track of the thread levels, and have very stable bottom tension.
The illustrations will demonstrate the bobbin loading procedure for both types of sewing machines.
Top-Loading
Remove the bobbin cover plate.

Drop the bobbin into the bobbin case with the thread running counter-clockwise.


Bring the thread through the first notch on the bobbin case and draw the thread to the left until it slips into the second notch. Pull out a 6-9" thread tail. Some machines have a little thread cutter to use next, but I find it cuts the thread too short for the final threading step.

Hold the thread taut and turn the hand-wheel to raise and lower the needle. This will pick up the bobbin thread.

Pull gently to bring up the entire bobbin thread. Pull both threads to the back of the machine, under the presser foot, and replace the bobbin cover plate.

Bottom-Loading
Lower or open the bobbin compartment hatch (yes, be quiet, I know my machine needs cleaning!).

Remove the bobbin cartridge from the bobbin case, using the hinged cartridge-pull. (When you flip the cartridge-pull up in order to grab it, a tiny level inside clamps the bobbin inside so that it doesn't fall out).

The bobbin cartridge looks like this:

Hold the cartridge by its sides, and insert the bobbin into the bobbin cartridge with the thread running counter-clockwise.
Holding the bobbin so it doesn't move, bring the thread through the first notch on the bobbin cartridge and draw the thread to the left until it slips/clicks into the thread guide. The tightness of the thread guide is adjusted by the tiny screw beside the first notch, and controls the tension of the bobbin thread.
Pull out a 6-9" thread tail. (I've left the bobbin out for these two photos to make them clearer.
This is the first notch.

This is the thread guide.

Flip up the hinged cartridge pull to secure the bobbin in place, and insert the loaded bobbin cartridge into the bobbin case, jiggling to make sure that the cartridge arm seats in the bobbin case. Gently pull a bit more thread out of the bobbin compartment.

Thread the Sewing Machine
Note: It is best to thread the machine while it is turned off.
Now that you’ve got a full bobbin in place, you can thread your sewing machine.
Start by putting a spool of thread on the spool pin and cap it with the spool holder, if needed. The thread should wind off the spool towards the back of the machine, (just like when filling the bobbin). Bring the thread to and around the upper thread guide.

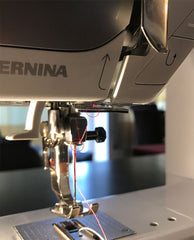
Then bring the thread forward in the channel. If you look closely, you’ll see two pairs of metal plates – the thread goes between them – one in back and one in front, that close when the pressor foot is lowered. This puts the correct amount of tension on the spool thread and is adjusted by the numbered wheel you can see in the photo (I've only shown my Bernina here).

Loop the thread down and around the U-shaped guide on the front of the machine. Hold the thread taut to make sure it engages with the tension discs on the top of the machine (I've only shown the Janome here).

Turn the handwheel on the side of the machine towards you to move the take-up lever to its highest position. Draw the thread through or around it (depending on your machine) to secure it in the eye of the take-up lever.


Then bring the thread down the left side of the U-shaped guide to the needle area, and feed the thread through the last one or two thread guides.

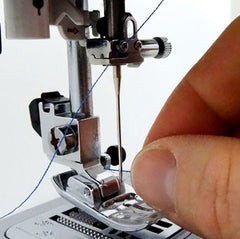
Finally, thread the needle.
And now you're ready to sew!